December 20, 2023
How to Use Low Code to Simplify Microservices Development
Microservices architecture is the go-to approach for many development teams. These apps can have greater flexibility and stability than their traditional counterparts.


By default, the 8base platform auto-generates an extremely powerful GraphQL API that gives you immediate API access to your data. Sometimes though, developers are using a 3rd party service or another tool that doesn't easily support the authoring and execution of GraphQL queries. Instead, they require that a REST API (or discrete endpoints) be available.
Developing a REST API in 8base can easily be accomplished using the Webhook custom function type. Using Webhooks, a developer can quickly code and deploy serverless functions that become available using traditional HTTP verbs (GET, POST, PUT, DELETE, etc.) and a unique path.
To get started building a REST API on top of an 8base workspace, you're going to need to have the following resources created/installed.
Once all those things are ready, go ahead and open the command line and use the following commands to generate a new 8base server-side project.
{% code-block language="sh" %}
# If not authenticated, login via the CLI
$ 8base login
# Generate a new 8base project and select your desired workspace
$ 8base init rest-api-tutorial
# Move into the new directory
$ cd rest-api-tutorial
{% code-block-end %}
That's it!
Let's go ahead and generate all of our serverless functions. We can do this pretty quickly using the 8base CLI's generator commands. Using the generators, we'll be able to create each one of our functions for each endpoint of our REST API.
{% code-block language="sh" %}
# Our Index records endpoint
8base generate webhook getUsers --method=GET --path='/users' --syntax=js
# Our create record endpoint
8base generate webhook newUser --method=POST --path='/users' --syntax=js
# Our get record endpoint
8base generate webhook getUser --method=GET --path='/users/{id}' --syntax=js
# Our edit record endpoint
8base generate webhook editUser --method=PUT --path='/users/{id}' --syntax=js
# Our delete record endpoint
8base generate webhook deleteUser --method=DELETE --path='/users/{id}' --syntax=js
{% code-block-end %}
As you've probably noticed at this point, we're building a REST API that gives access to our 8base workspace's Users table. This is because the Users table is created with the workspace by default, thus you don't need to create any new tables for the tutorial. That said, the same pattern we'll cover would work for any other database table you choose to use (or multiple).
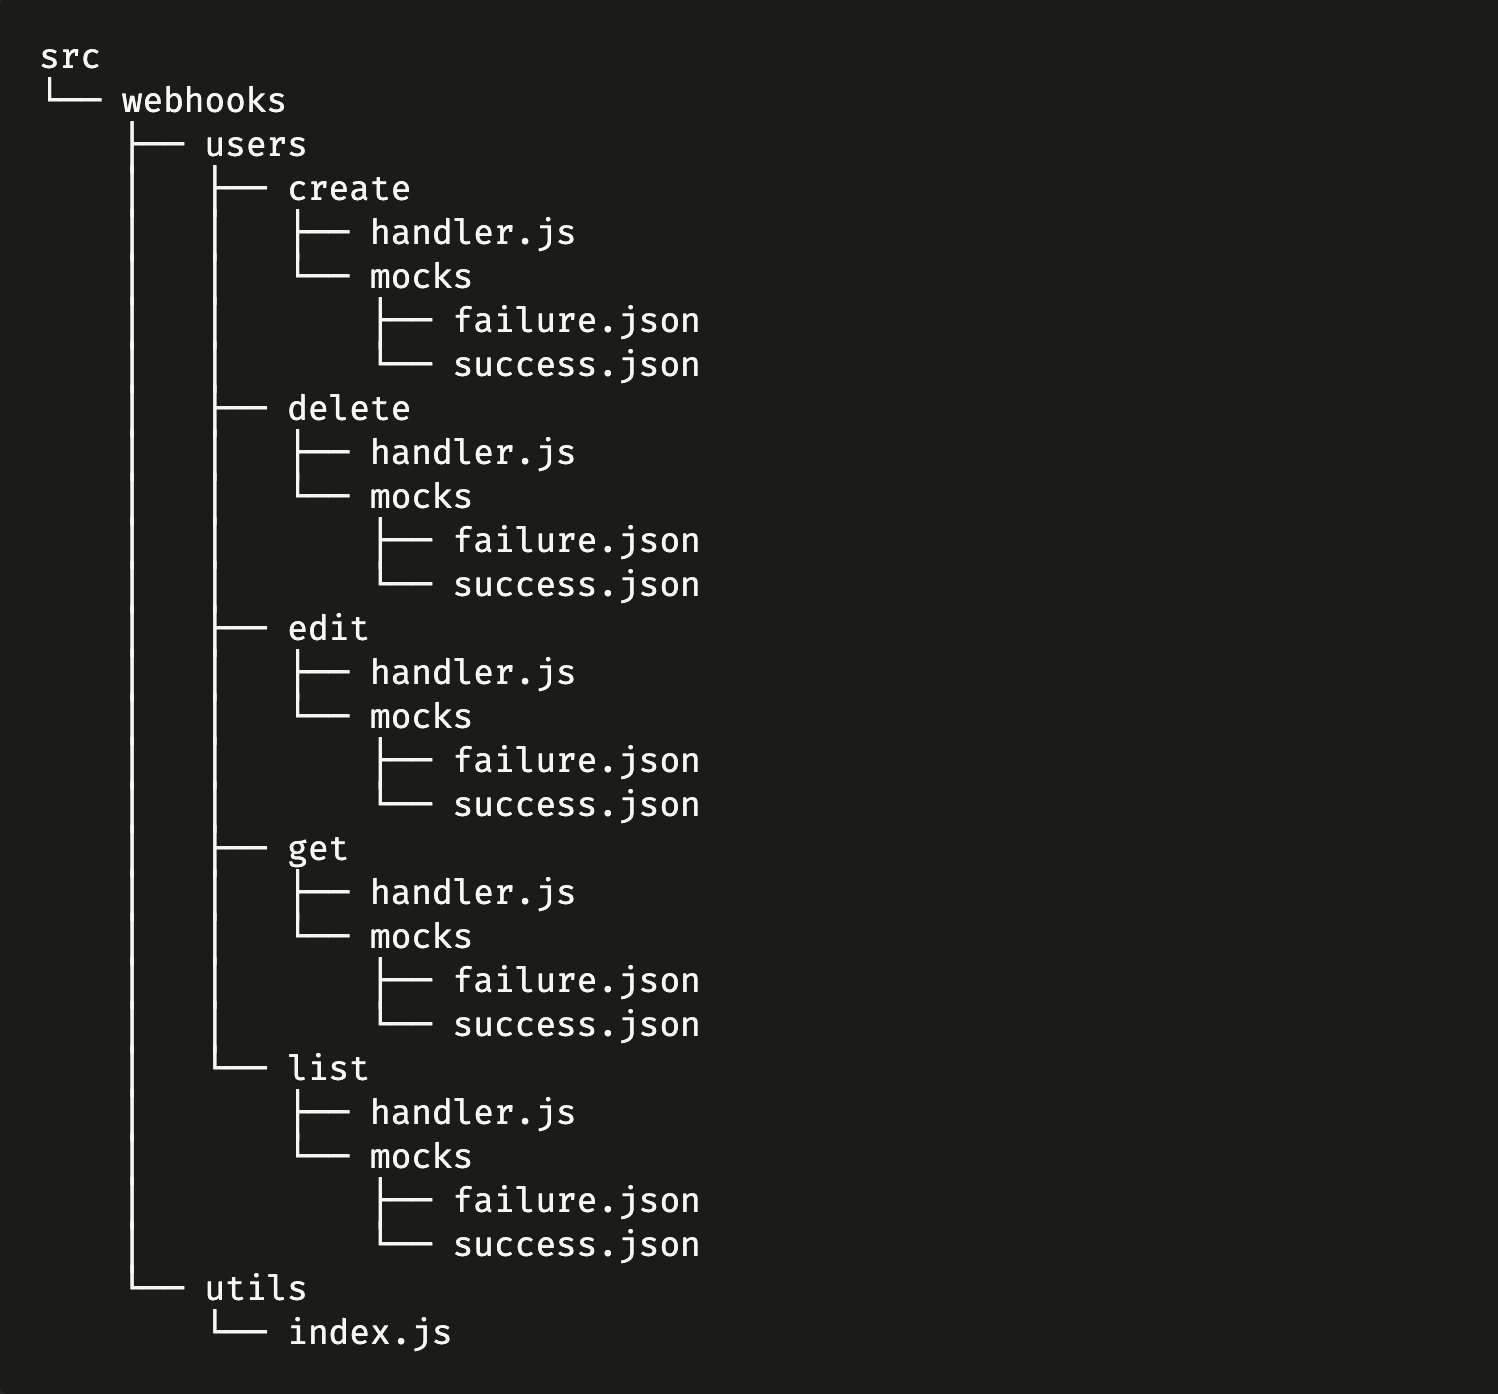
Additionally – since we are just building this API for the Users table – it's okay that all these functions are grouped at the top level of the src/webhooks director. If you are building a REST API that is going to deal with lots more tables or more custom endpoints, this directory structure might quickly feel busy/un-organized.
Nothing stopping you from restructuring your directory to better suit your organizational needs! All you need to do is make sure that the function declaration in the 8base.yml file has a valid path to the function's handler file/script. For example, take a look at the following directory structure and 8base.yml file:
{% code-block language="sh" %}
functions:
listUsers:
type: webhook
handler:
code: src/webhooks/users/list/handler.js
path: /users
method: GET
getUser:
type: webhook
handler:
code: src/webhooks/users/get/handler.js
path: '/users/{id}'
method: GET
createUser:
type: webhook
handler:
code: src/webhooks/users/create/handler.js
path: /users
method: POST
editUser:
type: webhook
handler:
code: src/webhooks/users/edit/handler.js
path: '/users/{id}'
method: PUT
deleteUser:
type: webhook
handler:
code: src/webhooks/users/delete/handler.js
path: '/users/{id}'
method: DELETE
{% code-block-end %}
For the sake of simplicity, let stick with the directory structure that was generated for us by the CLI! It's only important to know that such reconfiguration is possible.
Now that we have our serverless functions generated, let's go ahead and start adding some code to them. What's important to know about a Webhook function is that two important objects get passed through to the function via the event argument. They are data and pathParameters.
The data argument is where any data sent via a POST or PUT request can get accessed. Meanwhile, any query params or URL params sent via the request become accessible in the pathParameters object. Therefore, if a GET request was made to the endpoint /users/{id}?local=en, the value for id and local would both be available via event.pathParameters[KEY].
Knowing this, let's set up the GET User (/users/{id}) endpoint! To help with our GraphQL queries inside the function, add the GraphQL Tag NPM package using npm install -s graphql-tag. Then, go ahead and copy the code below into your getUser function's handler file.
{% code-block language="js" %}
/* Bring in any required imports for our function */
import gql from 'graphql-tag'
import { responseBuilder } from '../utils'
/* Declare the Query that gets used for the data fetching */
const QUERY = gql`
query($id: ID!) {
user(id: $id) {
id
firstName
lastName
email
createdAt
updatedAt
avatar {
downloadUrl
}
roles {
items {
name
}
}
}
}
`
module.exports = async (event, ctx) => {
/* Get the customer ID from Path Parameters */
let { id } = event.pathParameters
let { user } = await ctx.api.gqlRequest(QUERY, { id })
if (!user) {
return responseBuilder(404, { message: `No record found.`, errors: [] })
}
return responseBuilder(200, { result: user })
}
{% code-block-end %}
You'll likely spot an unrecognized import; responseBuilder. Webhook's require that the following keys get declared in returned objects - statusCode, body, and (optionally) headers. Instead of writing out and every single response object explicitly, we can start generating them using a handy responseBuilder function.
So let's go ahead and create a new directory and file using the following commands and then place our responseBuilder function in there.
{% code-block language="sh" %}
$ mkdir src/webhooks/utils
$ touch src/webhooks/utils/index.js
{% code-block-end %}
Copy in the following script.
{% code-block language="js" %}
/**
* Webhook response objects require a statusCode attribute to be specified.
* A response body can get specified as a stringified JSON object and any
* custom headers set.
*/
export const responseBuilder = (code = 200, data = {}, headers = {}) => {
/* If the status code is greater than 400, error! */
if (code >= 400) {
/* Build the error response */
const err = {
headers,
statusCude: code,
body: JSON.stringify({
errors: data.errors,
timestamp: new Date().toJSON()
})
}
/* Console out the detailed error message */
console.log(err)
/* Return the err */
return err
}
return {
headers,
statusCode: code,
body: JSON.stringify(data)
}
}
{% code-block-end %}
Awesome! Almost as if we were building a controller method that runs a SQL query and then returns some serialized data, here were exercising the same pattern but using a serverless function that utilizes the GraphQL API.
As you can imagine, the other functions are likely going to be similar. Let's go ahead and set them all up before we move into testing.
Let's now set up a way to list all Users via our REST API. Go ahead and copy the code below into your getUsers function's handler file.
{% code-block language="js" %}
import gql from 'graphql-tag'
import { responseBuilder } from '../utils'
const QUERY = gql`
query {
usersList {
count
items {
id
firstName
lastName
email
createdAt
updatedAt
}
}
}
`
module.exports = async (event, ctx) => {
/* Get the customer ID from Path Parameters */
let { usersList } = await ctx.api.gqlRequest(QUERY)
return responseBuilder(200, { result: usersList })
}
{% code-block-end %}
Let's now set up a way to add new Users via our REST API. Go ahead and copy the code below into your newUser function's handler file.
{% code-block language="js" %}
import gql from 'graphql-tag'
import { responseBuilder } from '../../utils'
const MUTATION = gql`
mutation($data: UserCreateInput!) {
userCreate(data: $data) {
id
email
firstName
lastName
updatedAt
createdAt
}
}
`
module.exports = async (event, ctx) => {
/**
* Here we're pulling data out of the request to
* pass it as the mutation input
*/
const { data } = event
try {
/* Run mutation with supplied data */
const { userCreate } = await ctx.api.gqlRequest(MUTATION, { data })
/* Success response */
return responseBuilder(200, { result: userCreate })
} catch ({ response: { errors } }) {
/* Failure response */
return responseBuilder(400, { errors })
}
}
{% code-block-end %}
Let's now set up a way to edit Users via our REST API. Go ahead and copy the code below into your editUser function's handler file.
{% code-block language="js" %}
import gql from 'graphql-tag'
import { responseBuilder } from '../../utils'
const MUTATION = gql`
mutation($data: UserUpdateInput!) {
userUpdate(data: $data) {
id
email
firstName
lastName
updatedAt
createdAt
}
}
`
module.exports = async (event, ctx) => {
const { id } = event.pathParameters
/* Combine the pathParameters with the event data */
const data = Object.assign(event.data, { id })
try {
/* Run mutation with supplied data */
const { userUpdate } = await ctx.api.gqlRequest(MUTATION, { data })
/* Success response */
return responseBuilder(200, { result: userUpdate })
} catch ({ response: { errors } }) {
/* Failure response */
return responseBuilder(400, { errors })
}
}
{% code-block-end %}
Let's now set up a way to edit Users via our REST API. Go ahead and copy the code below into your deleteUser function's handler file.
{% code-block language="sh" %}
import gql from 'graphql-tag'
import { responseBuilder } from '../../utils'
const MUTATION = gql`
mutation($id: ID!) {
userDelete(data: { id: $id }) {
success
}
}
`
module.exports = async (event, ctx) => {
const { id } = event.pathParameters
try {
/* Run mutation with supplied data */
const { userDelete } = await ctx.api.gqlRequest(MUTATION, { id })
/* Success response */
return responseBuilder(200, { result: userDelete })
} catch ({ response: { errors } }) {
/* Failure response */
return responseBuilder(400, { errors })
}
}
{% code-block-end %}
Nice work so far! Pretty straightforward, right? What's next is an extremely important step; testing. That is, how do we run these functions locally to make sure they are behaving as expected?
You may have noticed a directory called mocks that is in each of the function's directories. Essentially, mocks allow us to structure a JSON payload that gets passed as the event argument to our function when testing locally. The JSON object that gets declared in a mock file will be the same argument passed to the function when testing - nothing more, nothing less.
That said, let's go ahead and run our getUsers function since it ignores the event argument. We can do this using the invoke-local CLI command, as well as expect a response that looks like the following:
{% code-block language="sh" %}
$ 8base invoke-local listUsers
=> Result:
{
"headers": {},
"statusCode": 200,
"body": "{\"result\":{\"count\":1,\"items\":[{\"id\":\"SOME_USER_ID\",\"firstName\":\"Fred\",\"lastName\":\"Scholl\",\"email\":\"freijd@iud.com\",\"createdAt\":\"2020-11-19T19:26:53.922Z\",\"updatedAt\":\"2020-11-19T19:46:59.775Z\"}]}}"
}
{% code-block-end %}
Copy the id of the first returned user in the response. We're going to use it to create a mock for our getUser function. So, now add the following JSON in the src/webhooks/getUser/mocks/request.json file.
{% code-block language="json" %}
{
"pathParameters": {
"id": "[SOME_USER_ID]"
}
}
{% code-block-end %}
With this mock set up, let's go ahead and see if we can successfully use our REST API to get a user by their ID set in the URL params.
{% code-block language="sh" %}
$ 8base invoke-local getUser -m request
=> Result:
{
"headers": {},
"statusCode": 200,
"body": "{\"result\":{\"id\":\"SOME_USER_ID\",\"firstName\":\"Fred\",\"lastName\":\"Scholl\",\"email\":\"freijd@iud.com\",\"createdAt\":\"2020-11-19T19:26:53.922Z\",\"updatedAt\":\"2020-11-19T19:46:59.775Z\",\"avatar\":null,\"roles\":{\"items\":[]}}}"
}
{% code-block-end %}
Now, what if you want to specify data? Like, when you want to test an update? The exact sample principle applies. We add a data key to our mock with the data we expect to be sent to our endpoint. Try it yourself by adding the following JSON in the src/webhooks/editUser/mocks/request.json file.
{% code-block language="json" %}
{
"data": {
"firstName": "Freddy",
"lastName": "Scholl",
"email": "my_new_email@123mail.com"
},
"pathParameters": {
"id": "SOME_USER_ID"
}
}
{% code-block-end %}
Lastly, not all API requests are always successful... We added error handling to our functions because of this! Additionally, it would be a real pain to continuously be editing your mock file to first test a success, then failure, etc.
To help with this, you're able to create as many different mock files as you want and reference them by name! The CLI generator will help you and place the mock in the appropriate directory. For example:
{% code-block language="sh" %}
# Mock for a valid input for the editUser function
8base generate mock editUser --mockName success
# Mock for a invalid input for the editUser function
8base generate mock editUser --mockName failure
{% code-block-end %}
When running your tests now, you can use the different mocks to insure that both your error handling and successful responses are being properly returned. All you have to do is reference the mock file you wish to use by name via the -m flag.
{% code-block language="sh" %}
# Test an unsuccessful response
8base invoke-local editUser -m failure
=> Result:
{
headers: {},
statusCude: 400,
body: "{\"errors\": [\r\n {\r\n \"message\": \"Record for current filter not found.\",\r\n \"locations\": [],\r\n \"path\": [\r\n \"userUpdate\"\r\n ],\r\n \"code\": \"EntityNotFoundError\",\r\n \"details\": {\r\n \"id\": \"Record for current filter not found.\"\r\n }\r\n }\r\n ],\r\n \"timestamp\": \"2020-11-20T01:33:38.468Z\"\r\n}"
}
{% code-block-end %}
Deployment is going to be the easiest part here. Run 8base deploy... that's it.
However, you may be asking yourself a burning question at this point, "where do I find my endpoints?" Once everything is done being deployed, go ahead and run 8base describe in the CLI. You should get something like this back:
All your endpoints are now available at https://api.8base.com/{PATH_IN_TABLE_ABOVE}.
8base is an easy to use and scalable application backend that has an auto-generating GraphQL API. That said, for those developers building applications that require REST API interfaces, I hope this tutorial gave you some useful clues on how much can be accomplished using 8base!
Feel free to reach out with any questions!
We're excited about helping you achieve amazing results.


