December 20, 2023
How to Use Low Code to Simplify Microservices Development
Microservices architecture is the go-to approach for many development teams. These apps can have greater flexibility and stability than their traditional counterparts.

Discovering a new tool is quite the highlight for most developers, as it offers a fresh sense of intrigue and the opportunity to get one’s hands dirty while creating something interesting. Usually, the plan is building something fresh using the library and other times it is simply recreating a platform you commonly use; the latter tends to offer more appeal as it presents a real challenge.
In this article, I’m going to make use of 8base, a tool I recently discovered to build (attempt to at least) a clone of one of my favourite sites HackerNews. I went with HackerNews because of its simple user interface. It offers a simple look and a non-complex user experience which should be easy to replicate.
In this application, we’re going to build the following features:
The stack for the application is as follows:
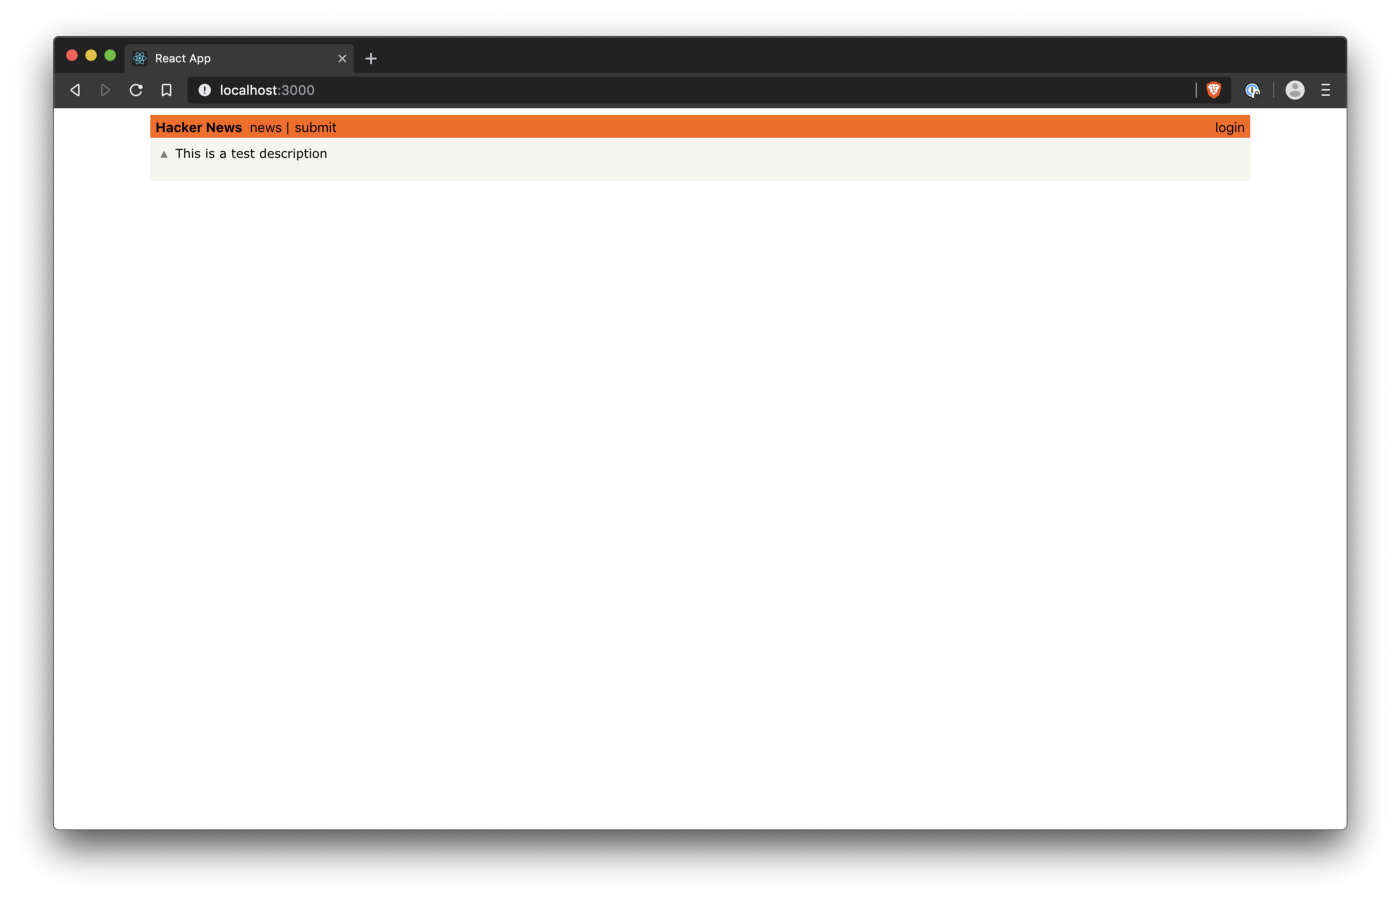
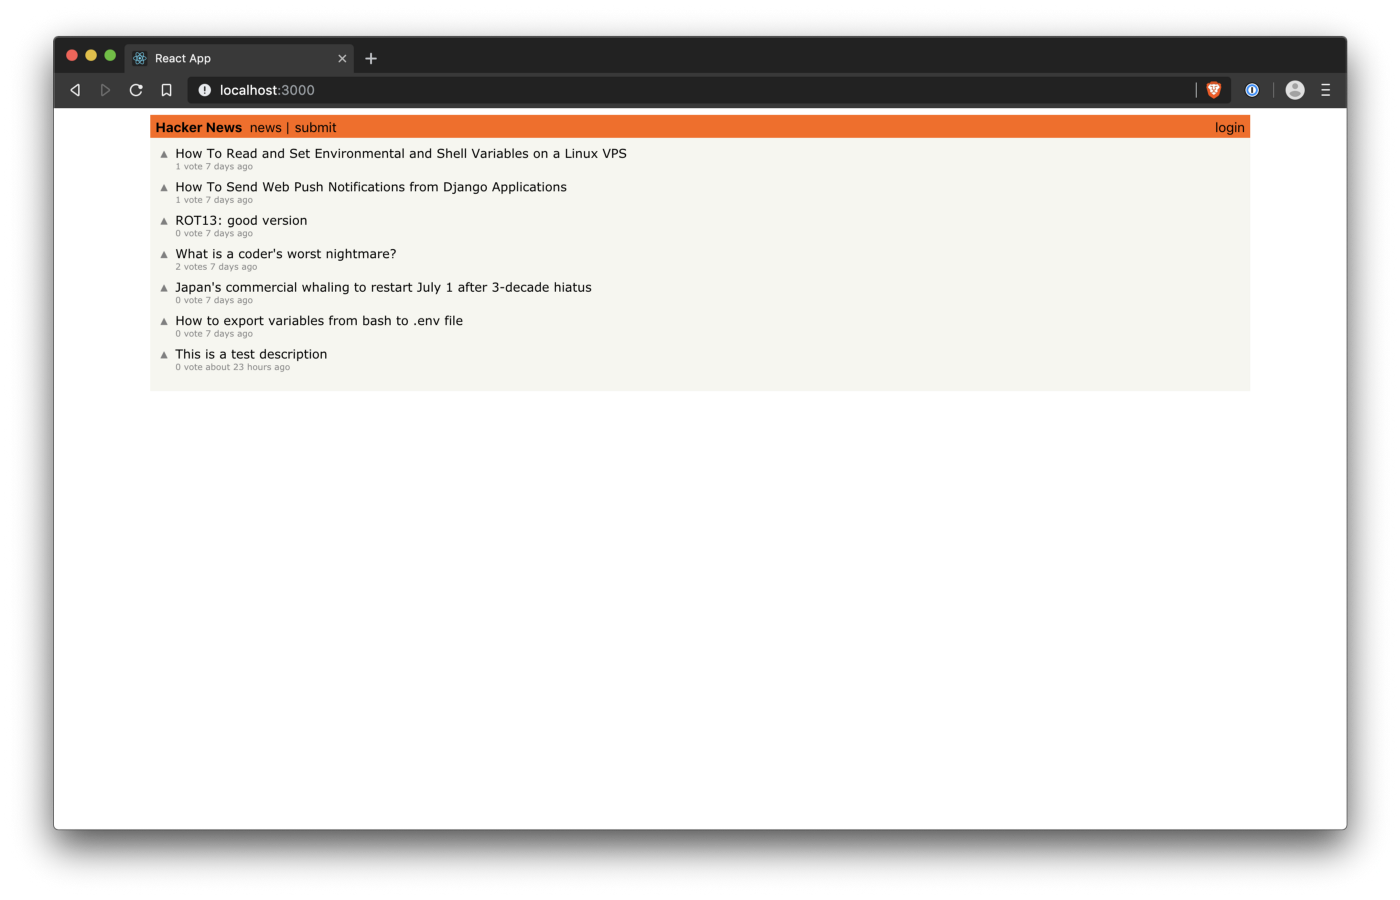
The screenshot below is my attempt at recreating the legendary HackerNews look:
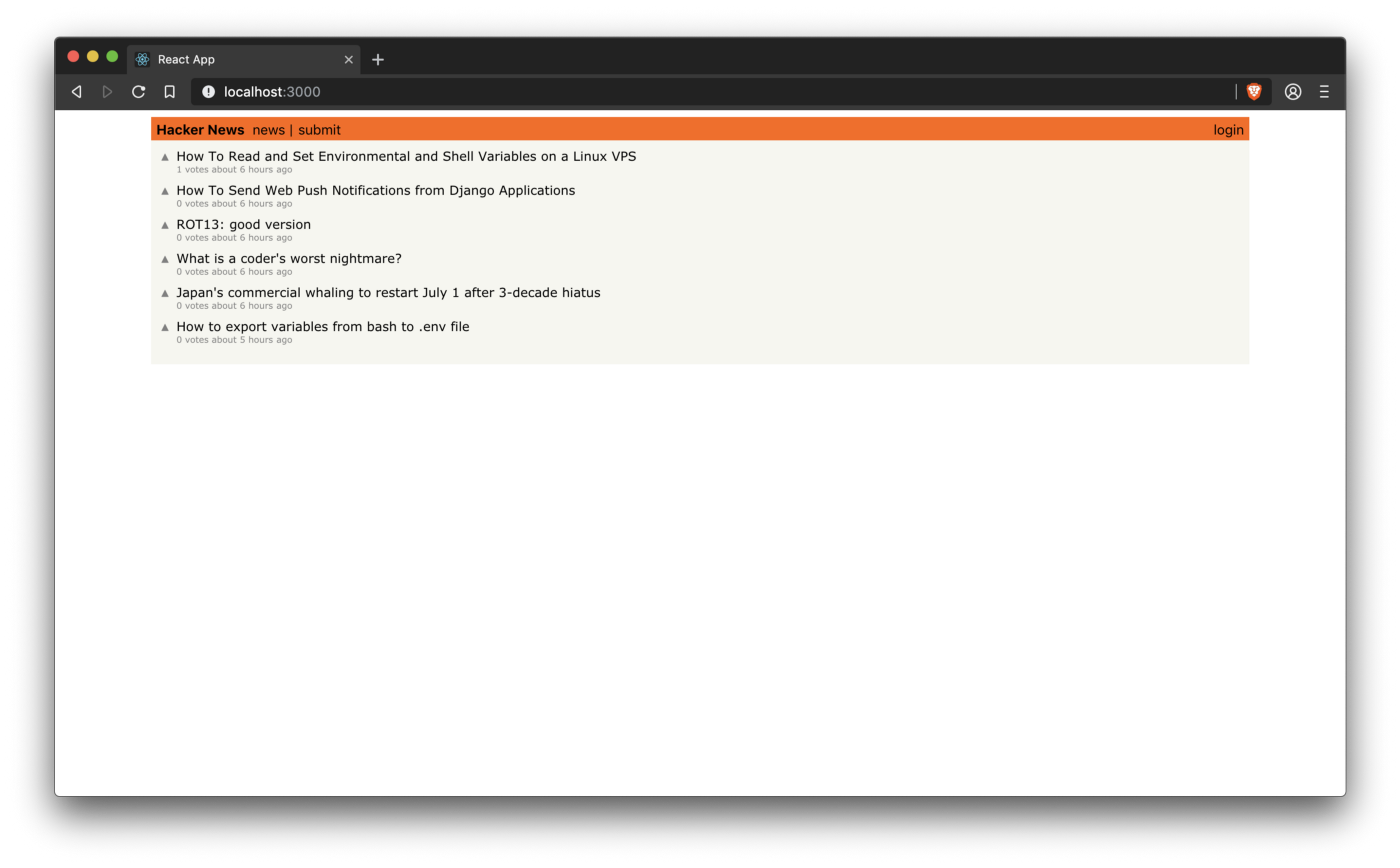
You can go a step further by interacting with the live demo here. Don’t spend too much time there, we have an application to build. Rush back.
To follow this tutorial, a basic understanding of React and Node.js is required. Please ensure that you have Node and npm/ yarn installed before you begin.
We’ll also be making use of some GraphQL queries in the project, so some familiarity with GraphQL is needed.
To get started using 8base, follow the steps listed below:
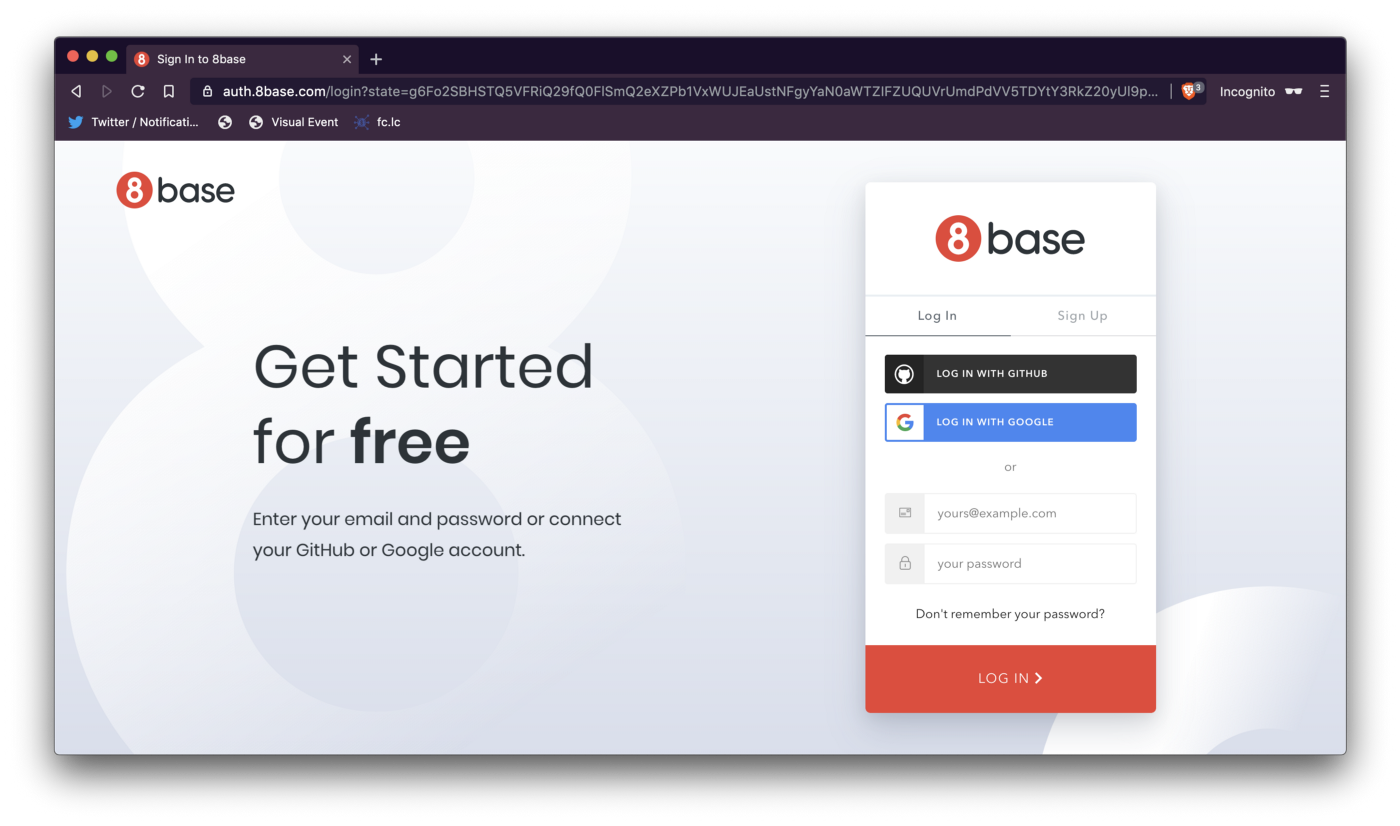
1. Create an account on 8base. 8base offers a free plan and pricing changes as usage increases.
2. After sign up is complete, click on the Data Builder button to navigate to the Data page and click on “New Table” to start building your backend.
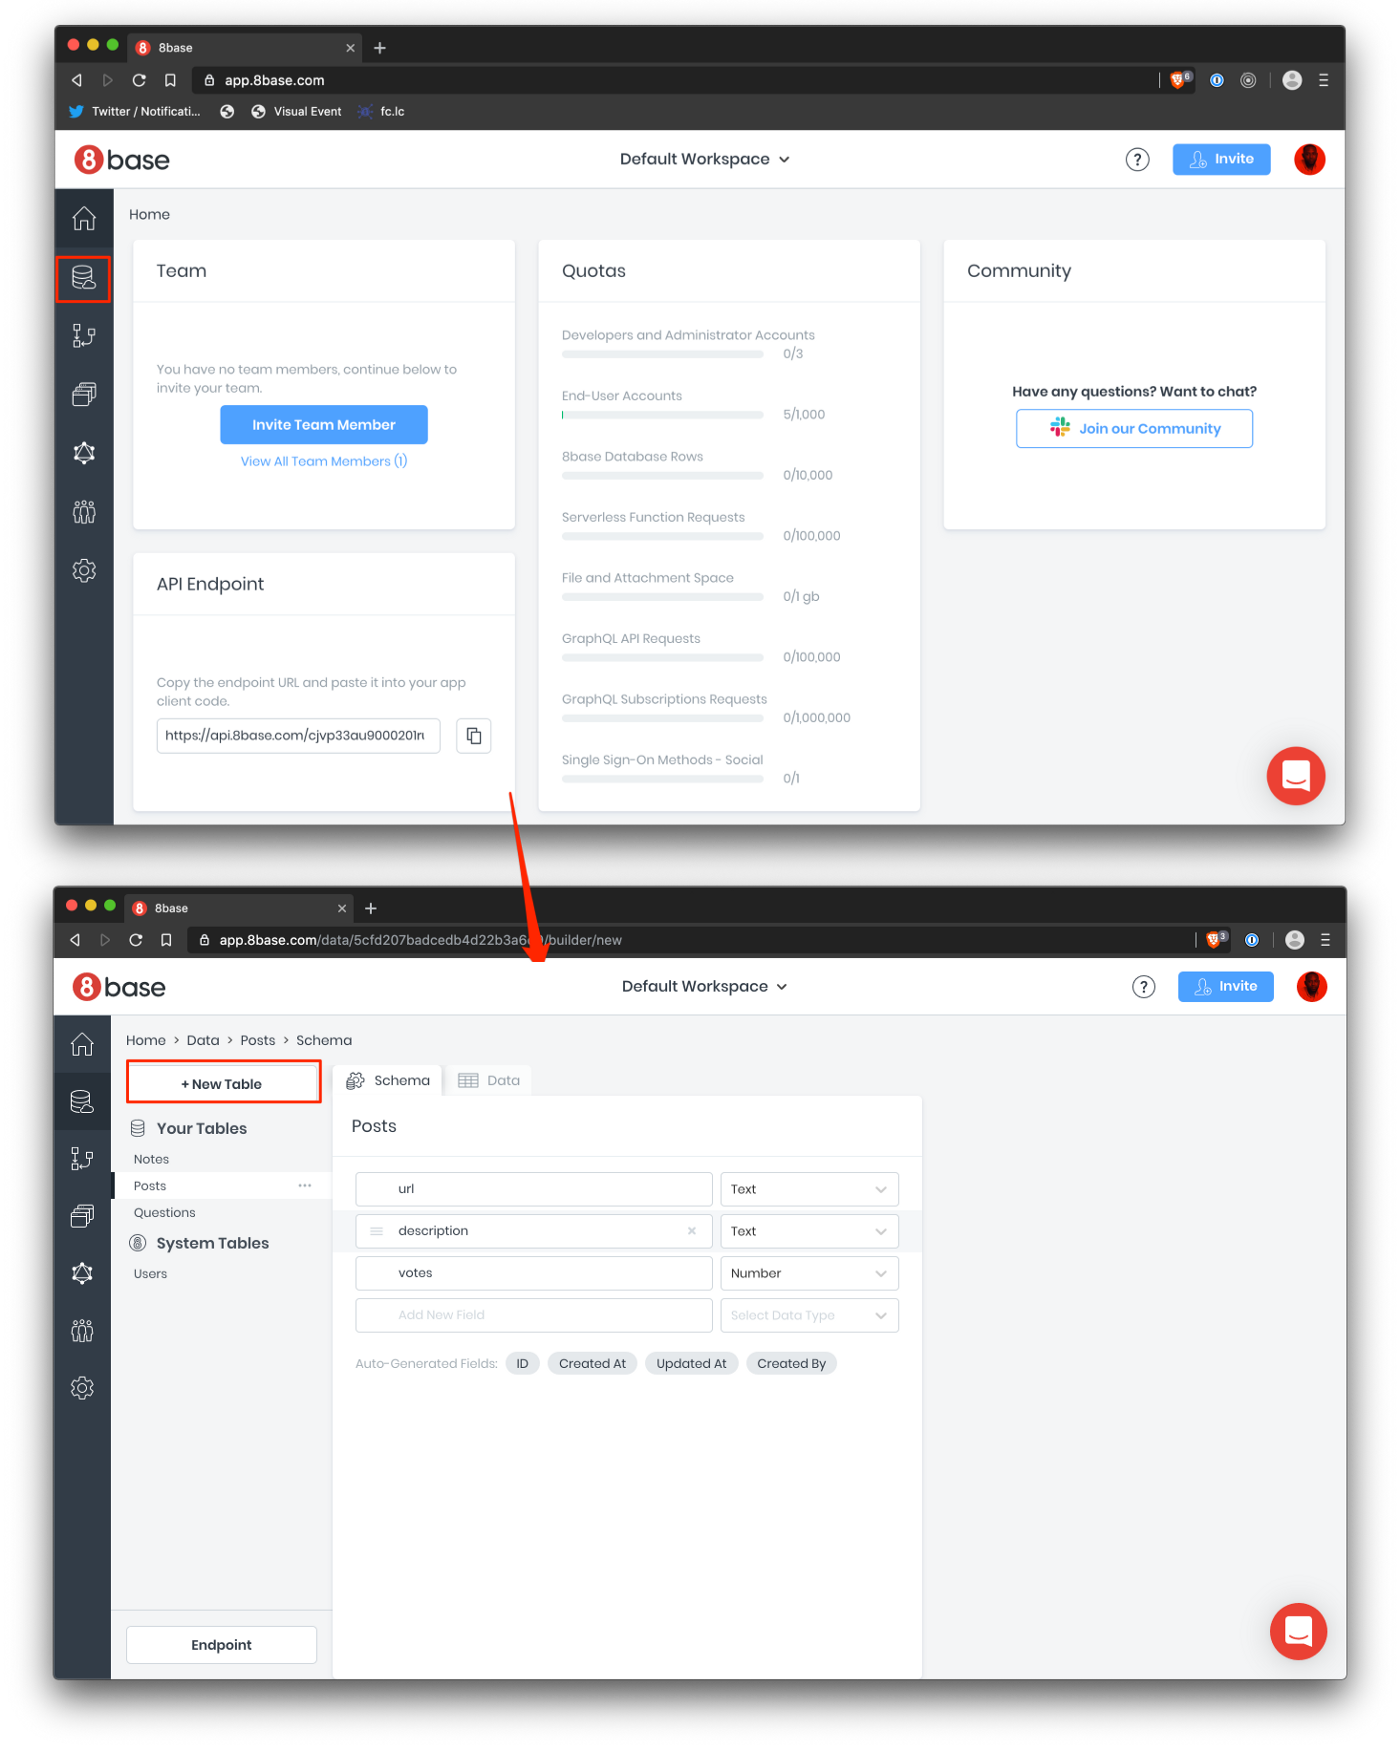
3. After your new table is loaded, you’ll be taken to the schema to begin defining fields.
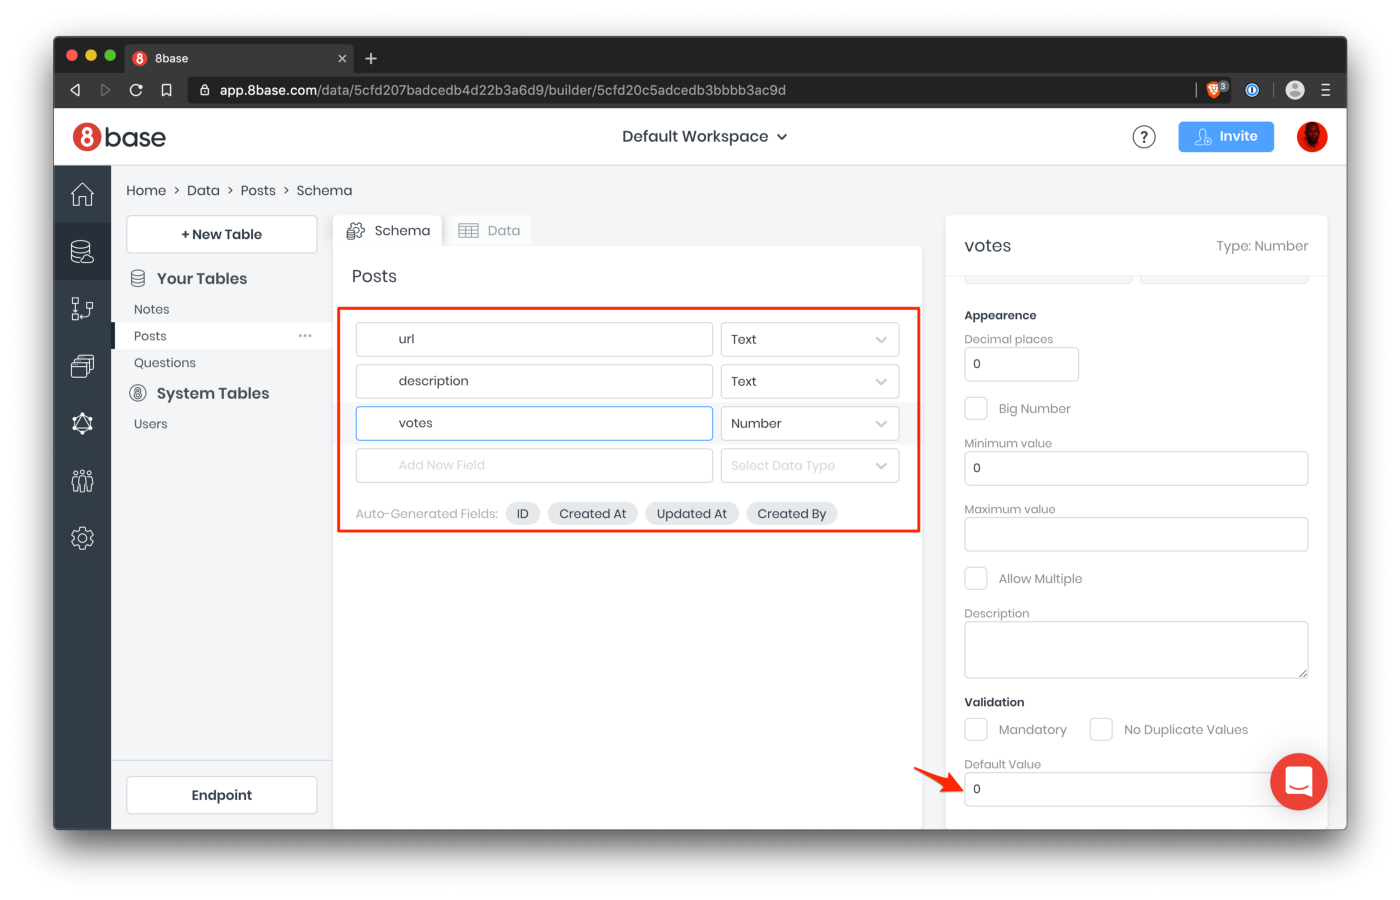
4. Go ahead and create a table named Posts that consists of the following fields:
url: The field type is Text. This will store the post URL.
description: Field type is Text. This field will hold the description for the URL we added.
votes: Field type Number. The field will display the number of votes for a post. Before creating the field, enter a default value of 0 for the field.
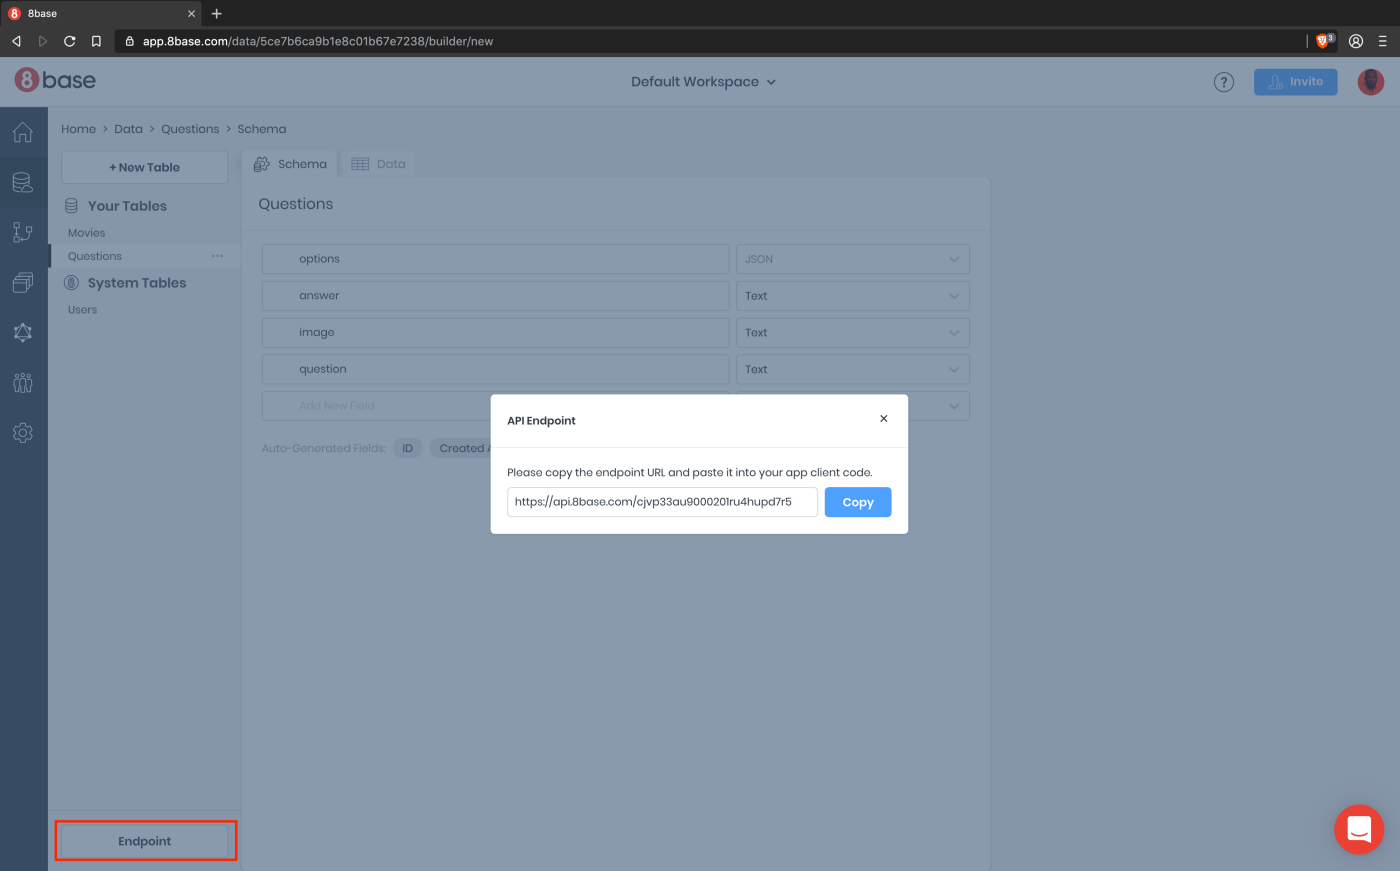
5. Next, copy the API endpoint URL (available on the bottom left) — This is your main line of communication between your frontend and your 8base backend.
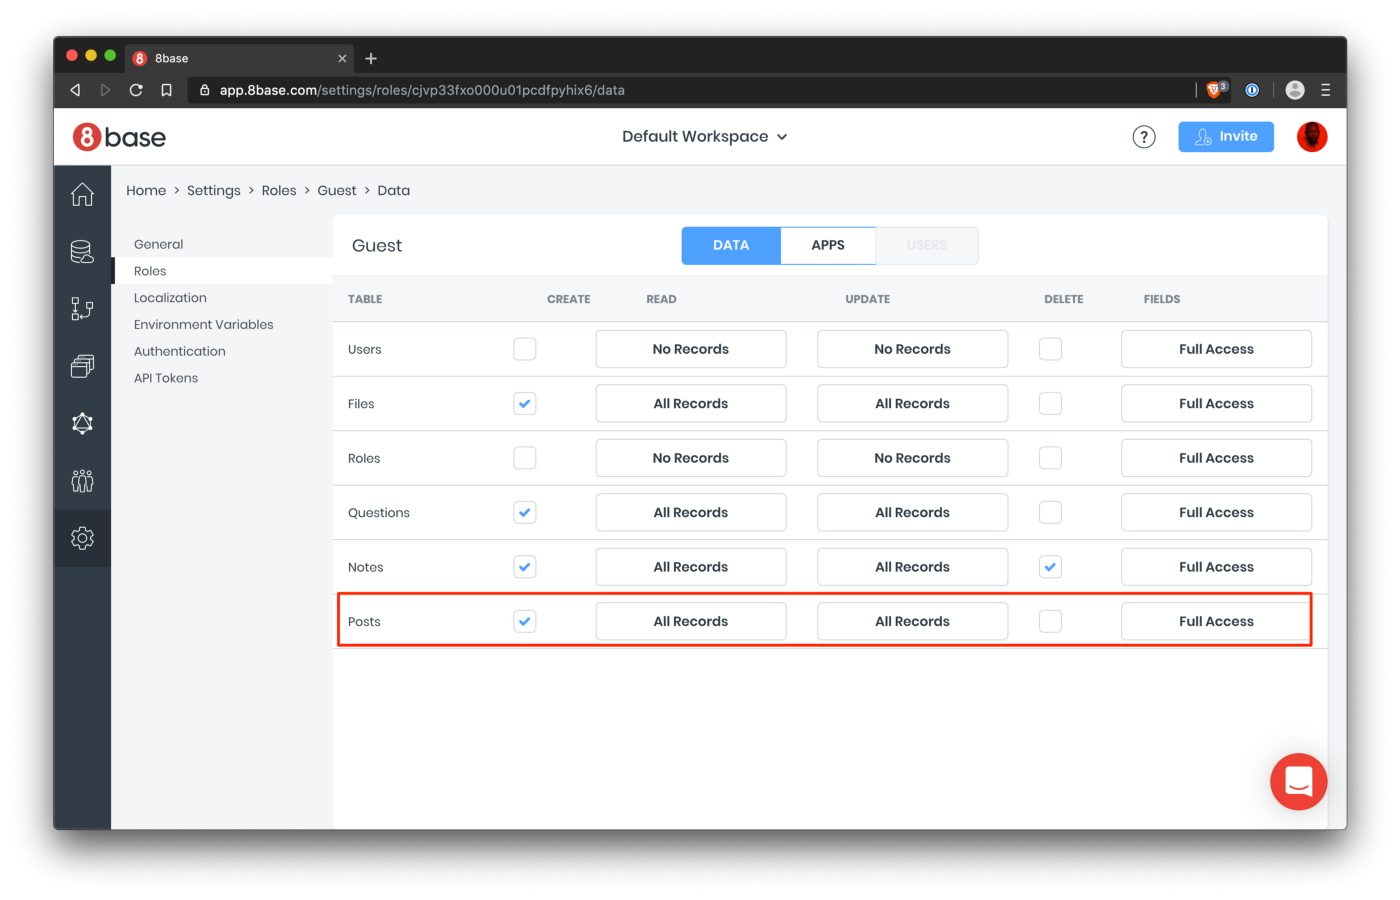
6. Finally, for the purpose of this tutorial we’re going to allow open access to Guests by default so that dealing with authentication is optional.
To allow guest access to your new Posts table, navigate to Settings > Roles> Guest and check the appropriate boxes under Posts. All unauthenticated users who access your API endpoint are given the role of Guest by default. Authentication is not covered in this tutorial. You can see how authentication should be handled in more detail here.
Now that we’ve finished setting up the backend using 8base, we’ll start work on the frontend side of the application.
I created a starter project for easy setup and to reduce overhead, ensuring the article focuses on getting started with 8base and GraphQL. The skeleton of the application has already been set up, this includes styling and project structure.
Run the following command to clone the repository:
{% code-block language="sh" %}
git clone -b starter https://github.com/HackAfro/react-hackernews
{% code-block-end %}
Open the folder and install the project’s dependencies by running the following command:
{% code-block language="sh" %}
cd react-hackernews && npm install
{% code-block-end %}
Start the React app server by running {% code-line %}npm start{% code-line-end %} in a terminal in the root folder of your project.
Now that our starter frontend application is up and running, the next step is to set up the client to communicate with the 8base backend using GraphQL. A useful library to help with the connection is apollo-boost, it provides a client for connecting to the GraphQL backend using a URI. The URI is the endpoint provided by 8base and is available on the data page of the dashboard. Let’s update the index.js file to set up the ApolloClient.
{% code-block language="js" %}
import React from "react";
import ReactDOM from "react-dom";
import { ApolloProvider } from "react-apollo";
import ApolloClient from "apollo-boost";
import * as serviceWorker from "./serviceWorker";
import "./index.css";
import App from "./App";
const client = new ApolloClient({
uri: "<YOUR_8BASE_ENDPOINT>"
});
ReactDOM.render(
<ApolloProvider client={client}>
<App />
</ApolloProvider>,
document.getElementById("root")
);
serviceWorker.unregister();
{% code-block-end %}
We then wrap the application with the ApolloProvider that takes a single prop, the client. The ApolloProvider loads the 8base table schema, which gives you access to all properties of the data model inside your frontend code.
Our first task is implementing fetching and loading of posts from the 8base backend. Our first task would be updating the PostList component to include the query for fetching posts. The component's skeleton is already available in the starter project, so all we need to do is slap some flesh on it and some tendons to get the parts moving.
Open the src/components/post-list/index.js file and make the following updates:
{% code-block language="js" %}
/* src/components/post-list/index.js */
import gql from "graphql-tag";
import { graphql } from "react-apollo";
{% code-block-end %}
These imports give you access to the gql function for writing queries and mutations, and the graphql HOC maps props to the provided component.
Next, we’ll add the query for fetching posts. Before getting to that, we should populate the backend with some data so you can see some results when the query is run. Navigate to the data page on the 8base dashboard and follow the steps below to add some data to the database.
After successfully creating a new row in the posts table, you can go ahead and update the post-list.js file with the GraphQL query for fetching posts. Check for the "TODO--2" comment and replace it with:
{% code-block language="js" %}
const POST_QUERY = gql`
query {
postsList {
items {
id
createdAt
url
description
votes
}
}
}
`;
{% code-block-end %}
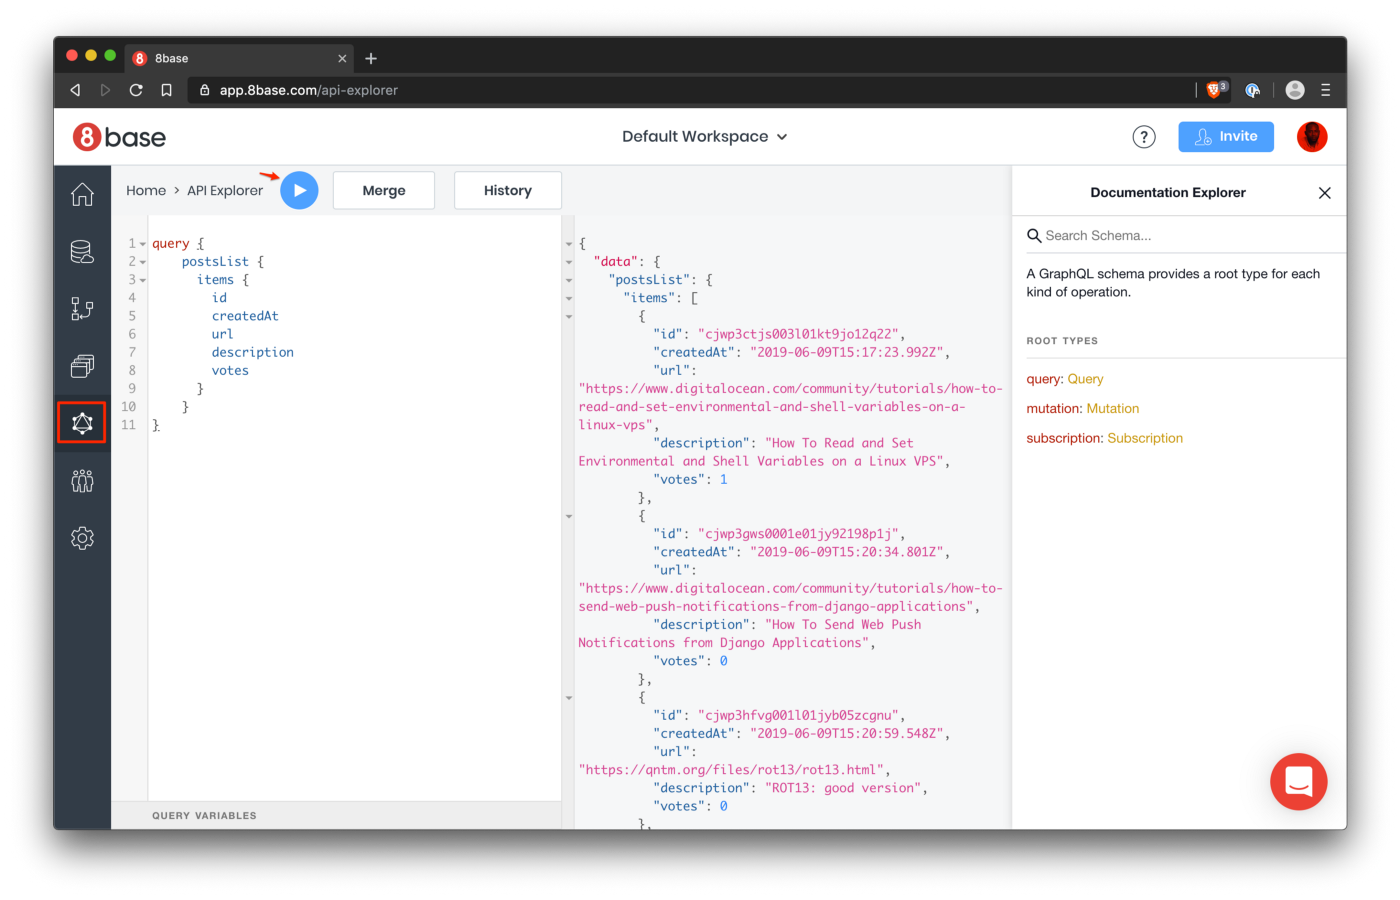
The id and createdAt fields are auto-generated by 8base, while the other fields were defined by us when creating the table. You can test this query in the API explorer provided by 8base, copy the query string and head to the 8base dashboard, click on the API explorer link on the sidebar, paste the query and run it; the response should be the row you created earlier.
Update the POST_QUERY with the following:
{% code-block language="js" %}
export default graphql(POST_QUERY, {
props(result) {
const { data } = result;
const { loading, refetch } = data;
let posts = [];
if (data && data.postsList) posts = data.postsList.items;
return {
loading,
posts,
refetch
};
}
})(PostList);
{% code-block-end %}
What’s going on here is that we provide the graphql HOC with the query string and an options object. Within the options object, we decide the values that'll be passed to our component as props. In the props method, we check if the {% code-line %}data.postsList.items{% code-line-end %} exists, then we assign it to the posts variable and return it including the loading state and the refetch function.
After this change, if we navigate to http://localhost:3000 we can see the post we created showing up on the page.
This shows meaningful progress, but what good is the application if we can only view posts but not create them, for this specific reason, we’ll move to flesh out the post submission view. Don’t go anywhere!!
After our successful attempt at listing posts, let’s go a step further by adding the post creation page. HackerNews has very minimal styling for this page, so we didn’t have to do much when setting up the page. All the styling for the page and the skeleton of the component is available in the starter project.
Our assignment for this page is adding the GraphQL mutation for creating posts. The flow of the component will be as follows:
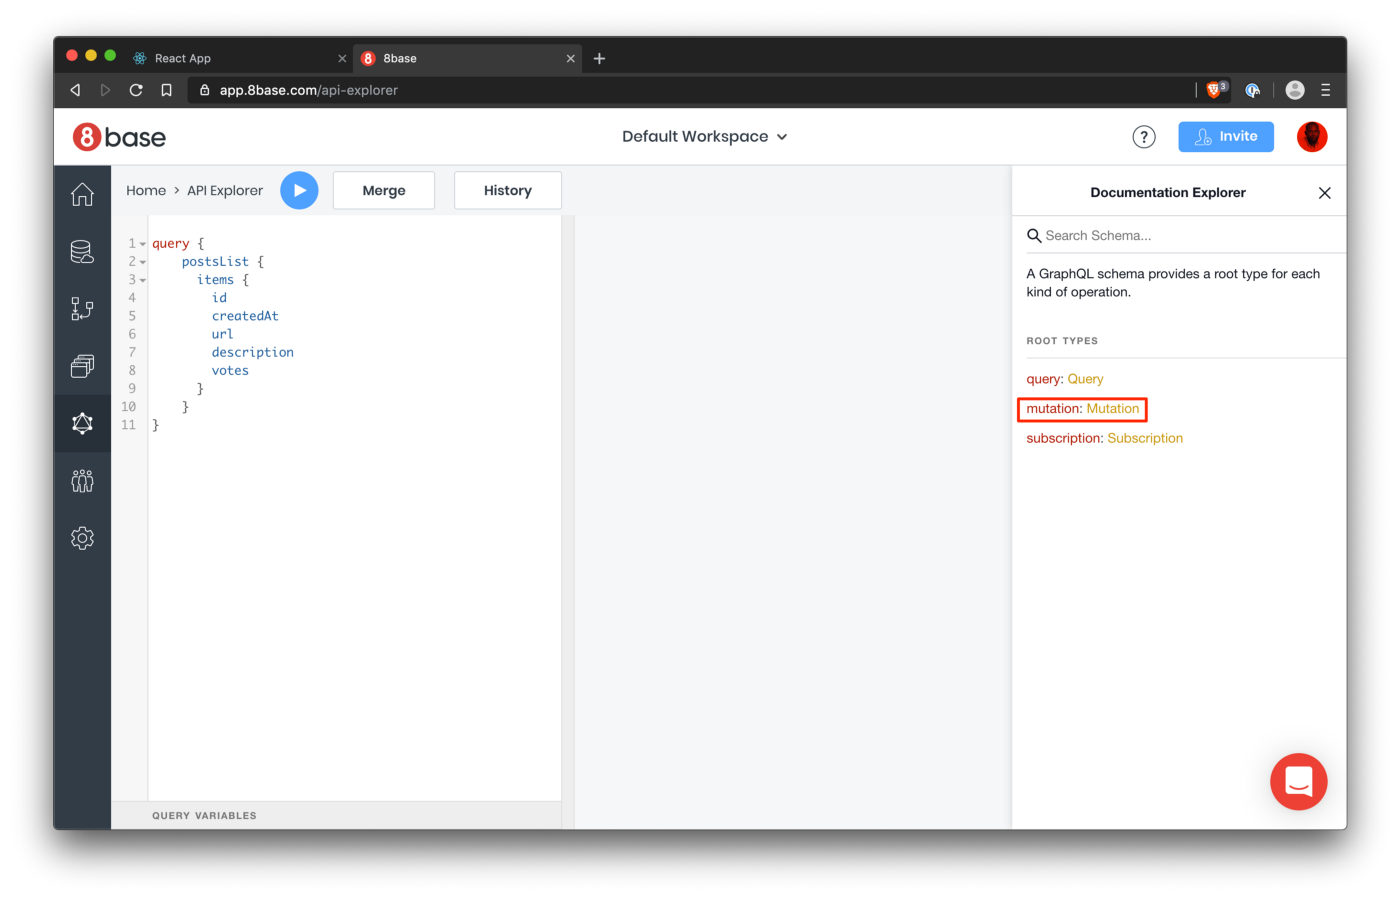
Before making any changes to the existing codebase, let’s look at how we can easily write mutations for creating posts. An easy way of determining queries and mutations when working with 8base is going through the API Explorer. Navigate to the API Explorer page, and you should see the mutations link in the Document Explorer section.
Clicking on the mutations link leads you to a view showing all the possible mutations for your 8base tables. Scroll to the postCreate mutation, this is the mutation that we're looking for.
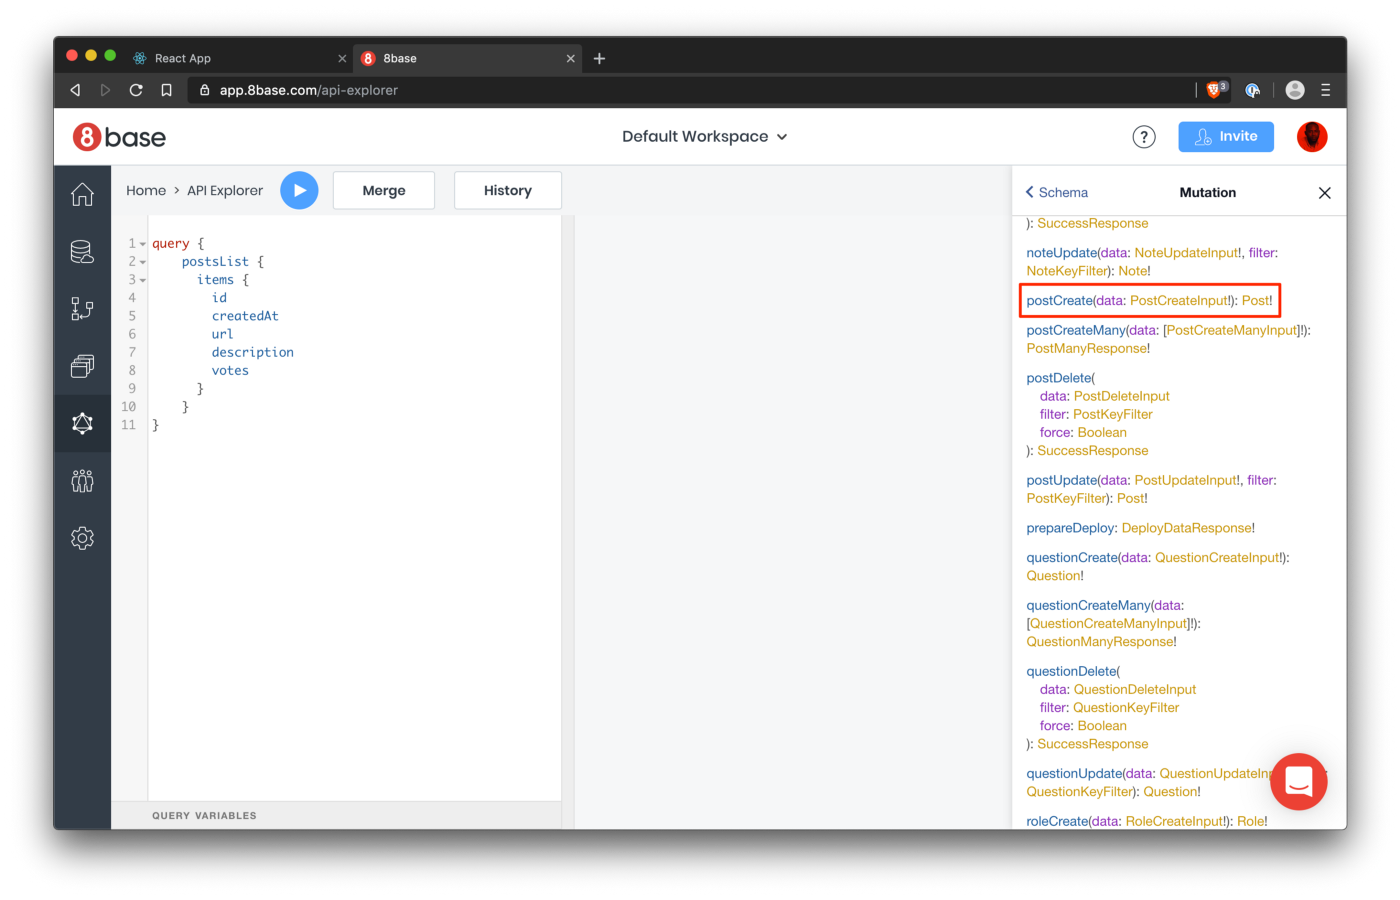
In the screenshot above, we can see that the postCreate mutation take a PostCreateInput and returns a Post response. The PostCreateInput contains the fields required to create a post, which are the url and description, the votes field has a default value and is an optional field.
Enough talking, let’s put what we’ve seen so far to use. Open the src/components/submit/index.js file and make the following updates. In the file, you'll see some "TODO" comments which signify the additions required to create a post successfully.
{% code-block language="js" %}
import gql from "graphql-tag";
import { Mutation } from "react-apollo";
{% code-block-end%}
We’ll need the gql method for creating the mutation string, while the Mutation component is what you'll use to trigger mutations from your UI. We pass a GraphQL mutation string wrapped with the gql function as a prop to the mutation component and provide a render function as the component children.
{% code-block language="js" %}
const POST_MUTATION = gql`
mutation PostCreate($data: PostCreateInput!) {
postCreate(data: $data) {
id
}
}
`;
{% code-block-end%}
In the snippet above, we’re requesting the id of the newly created post as a response. The next update will be wrapping the form with the Mutation component, update the return block of the component to look like the snippet below:
{% code-block language="js" %}
<Mutation mutation={POST_MUTATION}>
{postCreate => (
<form
onSubmit={e => {
e.preventDefault();
onFormSubmit(postCreate);
}}
>
...
</form>
)}
</Mutation>;
{% code-block-end%}
The render function provides a postCreate function that will be used for creating posts. The next step is populating the onFormSubmit event handler; within the function, we'll make pass the post object to the postCreate function in an attempt to create a post.
Update the onFormSubmit function to be similar to the snippet below:
{% code-block language="js" %}
const onFormSubmit = async createPost => {
const data = {
variables: {
data: post
}
};
const response = await createPost(data);
if (response.data.postCreate.id) {
history.push("/");
}
};
{% code-block-end%}
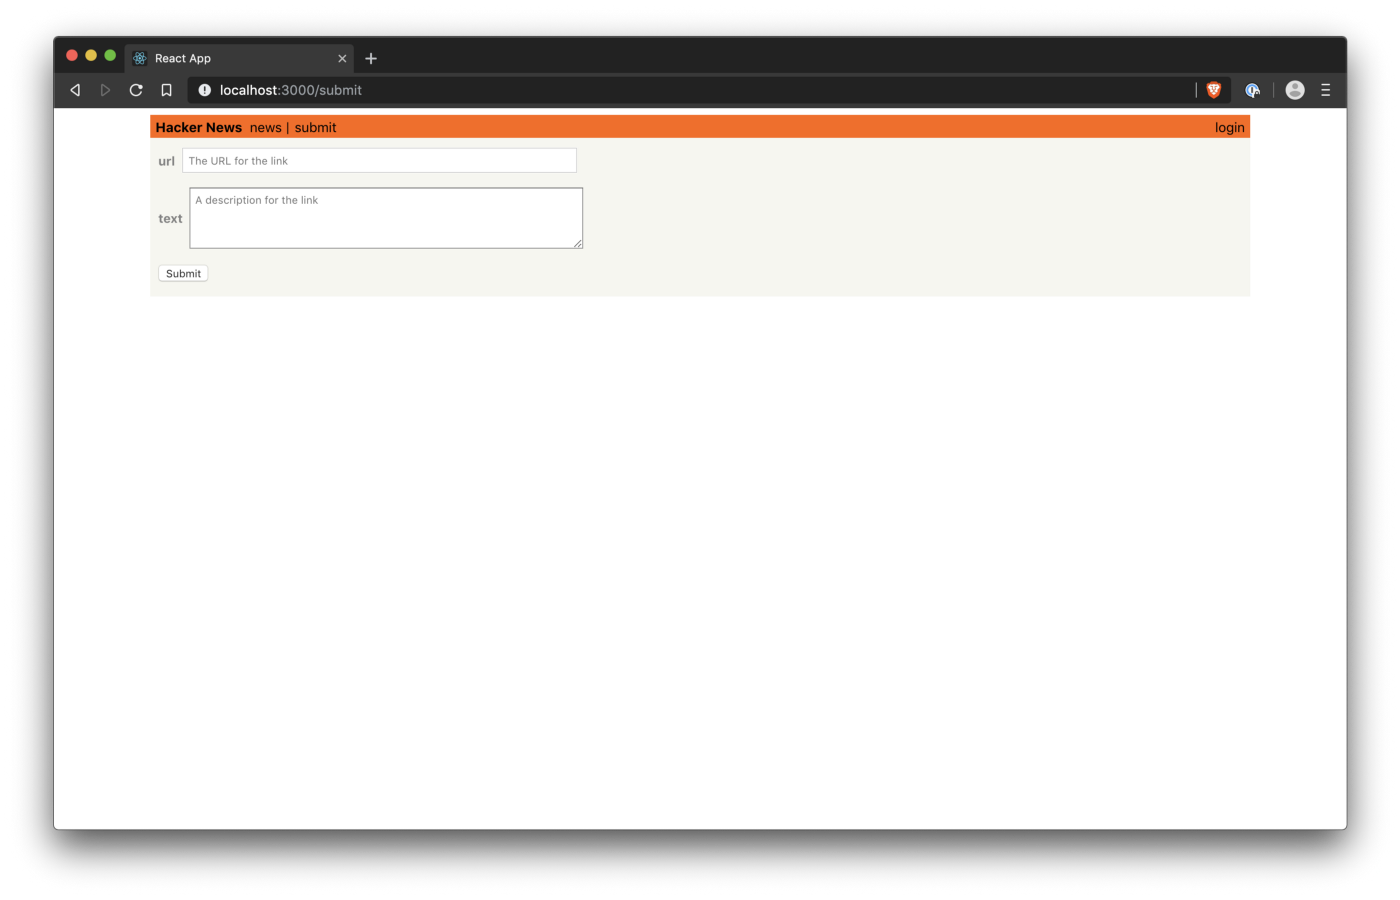
If you navigate to http://localhost:3000/submit, you should see the post creation form. Try creating a post by adding a URL and description.
If you can successfully create a post, you can move on to the next section. In the next section, we’ll add the voting feature for a post and also display a post’s metadata.
Another great HackerNews feature is the ability to upvote posts. We added the votes field to the Posts table for this purpose, so we'll simply increment this number in the data store when a vote is placed. To achieve this, we'll use the update mutation.
Open the src/components/post-item/index.js file and make the following changes:
{% code-block language="js" %}
import { Mutation } from "react-apollo";
import distanceInWords from "date-fns/distance_in_words_to_now";
import gql from "graphql-tag";
{% code-block-end %}
We have the usual suspects, gql and Mutation to aid us with running GraphQL mutations and then the odd one out is distanceInWords; this is a function exported by the date-fns library for telling the distance in words from a given date to the current date. For example - 5 minutes ago
Next, we’ll use the gql function in creating the mutation string. Replace the "TODO--2" comment with the mutation string below:
{% code-block language="js" %}
const VOTE_MUTATION = gql`
mutation PostUpdate($data: PostUpdateInput!) {
postUpdate(data: $data) {
id
}
}
`;
{% code-block-end %}
It’s an update mutation and it takes a PostUpdateInput body which contains the fields within a Post item, most importantly the id. Now let's utilize the Mutation component by wrapping the upvote button with it.
{% code-block language="js" %}
<Mutation mutation={VOTE_MUTATION}>
{postUpdate => <button onClick={e => upVotePost(postUpdate, post)}>▲</button>}
</Mutation>
{% code-block-end %}
The component provides a postUpdate function for handling update mutations on a post. The next step will be updating the body of the upVotePost event handler. Find the "TODO--4" comment and update the body of the function to be similar to the snippet below:
{% code-block language="js" %}
<Mutation mutation={VOTE_MUTATION}>
{postUpdate => <button onClick={e => upVotePost(postUpdate, post)}>▲</button>}
</Mutation>
{% code-block-end %}
The body of the function is quite simple, we construct the data for the mutation using the post object and then we call the vote (postUpdate) function to upvote the post. Finally, we call the refetch function after voting to display the vote count on the post; we do this to mimic real-time updates.
{% code-block language="js" %}
// TODO -- 5
<div className="meta">
<span>
{post.votes} vote{post.votes > 1 ? "s" : ""}
</span>
<span>{distanceInWords(post.createdAt)} ago</span>
</div>
{% code-block-end %}
In the snippet above, we display the vote counts using the votes property on the post and the creation date of the post in relative time using the distanceInWords function.
The final look of the src/components/post-item/index.js file should be similar to the following:
{% code-block language="js" %}
import React from "react";
import { Mutation } from "react-apollo";
import distanceInWords from "date-fns/distance_in_words_to_now";
import gql from "graphql-tag";
const VOTE_MUTATION = gql`
mutation PostUpdate($data: PostUpdateInput!) {
postUpdate(data: $data) {
id
}
}
`;
const PostItem = ({ post, refetch }) => {
const upVotePost = async (vote, post) => {
const data = {
variables: {
data: {
id: post.id,
url: post.url,
description: post.description,
votes: post.votes + 1
}
}
};
await vote(data);
refetch();
};
return (
<article className="post">
<section className="upvote">
<Mutation mutation={VOTE_MUTATION}>
{postUpdate => (
<button onClick={e => upVotePost(postUpdate, post)}>▲</button>
)}
</Mutation>
</section>
<section className="body">
<div className="title">
<a href={post.url}>{post.description}</a>
</div>
<div className="meta">
<span>
{post.votes} vote{post.votes > 1 ? "s" : ""}
</span>
<span>{distanceInWords(post.createdAt)} ago</span>
</div>
</section>
</article>
);
};
export default PostItem;
{% code-block-end %}
If you go to the post listing page http://localhost:3000 you should be able to upvote a post and see the vote count for that post displayed under the post alongside the creation date of the post in relative time.
In this article, we’ve been able (attempted) to recreate some of the functionalities of HackerNews using a simple stack consisting of React, GraphQL and 8base as the data layer. We’ve seen how to successfully query GraphQL endpoints with the help of libraries like react-apollo and also how to write mutations using the graphql-tag library. So far we have seen how to create posts and list them and also added the ability to upvote a post, in the next article we will see how to authenticate users and link posts to users. Don’t forget to play with the final demo hosted here. Happy coding.
We're excited about helping you achieve amazing results.


